PART I: GENERAL INTRODUCTION
1. Subjects of application:
The process applies to entities that are exporters and importers, customs agents, transport carriers, forwarding agents (hereinafter referred to as Enterprises) with tax identification numbers, and carry out procedures related to tax code. export and import of goods, transit of means of transport.
2. Address for registration:

Job Register to join VNACCS For users who are customs declarants, it will be done through the website of the Customs office at https://www.customs.gov.vn. Registrants after entering the above address find the link 'User registration of VNACCS . system' in the 'Public Service' section. The following are detailed instructions for user registration for each VNACCS user.
3. Requirements and notes:
Requires installation of Java in 64-bit or 32-bit versions according to the machine to read digital signatures, this version of Java is available at the user registration page.
Use on Internet Explorer 7.0 or later browser.
Enterprises registering to use the VNACCS system must pre-register digital signature information at the customs website at: www.customs.gov.vn.
When there is a new, modified or canceled registration form, it must be one day after receiving the system's acceptance response for the registration information to take effect.
4. Definitions:
 Unit code (User code): Identifier (5 characters) for businesses in the system, each business will usually have 01 representative User code, but in case the business has many branches, it can be registered Sign more corresponding User code for branches.
User ID: Each User code (8 characters) will have one or more User IDs, the User IDs represent each declarer of the business when using the system. User ID will be provided by the system according to the User code + xxx structure (where xxx is 3 consecutive numbers).
Terminal ID and Terminal Access Key: These are the parameters returned by the system when registering to identify the workstation and the code to connect to the VNACCS system. When installing terminal software, self-built or third-party software, the user must set up this information.
Code table of Customs Departments of provinces and cities for enterprises to send when registering:
Name of Customs Department |
Department code |
| Hanoi Customs Department | 01ZZ |
| Ho Chi Minh City Customs Department | 02ZZ |
| Hai Phong Customs Department | 03ZZ |
| Ha Giang Customs Department | 10ZZ |
| Cao Bang Customs Department | 11ZZ |
| Dien Bien Customs Department | 12ZZ |
| Lao Cai Customs Department | 13ZZ |
| Lang Son Customs Department | 15ZZ |
| Bac Ninh Customs Department | 18ZZ |
| Quang Ninh Customs Department | 20ZZ |
| Thanh Hoa Customs Department | 27ZZ |
| Nghe An Customs Department | 29ZZ |
| Ha Tinh Customs Department | 30ZZ |
| Quang Binh Customs Department | 31ZZ |
| Quang Tri Customs Department | 32ZZ |
| Thua Thien - Hue Customs Department | 33ZZ |
| Da Nang Customs Department | 34ZZ |
| Quang Ngai Customs Department | 35ZZ |
| Binh Dinh Customs Department | 37ZZ |
| Gia Lai Customs Department | 38ZZ |
| Dak Lak Customs Department | 40ZZ |
| Khanh Hoa Customs Department | 41ZZ |
| Binh Duong Customs Department | 43ZZ |
| Tay Ninh Customs Department | 45ZZ |
| Dong Nai Customs Department | 47ZZ |
| Long An Customs Department | 48ZZ |
| Dong Thap Customs Department | 49ZZ |
| An Giang Customs Department | 50ZZ |
| Ba Ria – Vung Tau Customs Department | 51ZZ |
| Kien Giang Customs Department | 53ZZ |
| Can Tho Customs Department | 54ZZ |
| Ca Mau Customs Department | 59ZZ |
| Quang Nam Customs Department | 60ZZ |
| Binh Phuoc Customs Department | 61ZZ |
5. Guidance for businesses that have gone to the Customs Departments of provinces and cities to get user account information and the case when registering a new user that the message "OE1001-00009: The enterprise already exists" registration form on the system”
To create favorable conditions for businesses in the registration process, the system has made default information available for some businesses, now businesses only need to add information, modify information, not New registration is required. In case the enterprise registers a new user, the user receives the message "OE1001-00009: The enterprise already exists a registration declaration on the system" or the enterprise has gone to the Customs Departments of provinces and cities to get information. Accounts need to follow these steps:
Step 1: Follow Section 1.1, Part II to register for an administrator account and log in to the system.
Step 2: Implement Section 2.1, Part II to modify the default information that the system has made available to the enterprise and add the number of computers that the enterprise uses to declare.
Step 3: Implement section 2.2, Part II to add User code after it is approved by Customs. In case the enterprise needs to add User code (for branch), then enter. If you don't need it, skip it.
Step 4: Implement section 2.3, Part II to add User ID after being approved by Customs in case the enterprise needs to add User ID (add user). If you don't need it, skip it.
Step 5: Follow Section 3 and Section 4, Part II to invalidate and change the password for User ID and admin account.
PART II: DETAILED INSTRUCTIONS
1. Register information
1.1 Steps to register:
Step 1: Do item 1.1. Register for an admin account
Step 2: Do item 1.2. Registrants use an administrative account to register user information of the enterprise's VNACCS system
Step 3: Perform section 1.3. Edit registration information before sending to the system (If any)
Step 4: Implement section 1.4. Submit registration information to the customs system for approval
Step 5: Perform section 1.5. Check and confirm
Step 6: Implement section 1.6. The registrant looks up the registration result after the customs system accepts the registration.
Details of the specific steps are described below:
1.1. Register for an admin account
After accessing the user registration website, the registrant needs to do the following steps:
Step 1: Register for an admin account
Subscribers to the New Register function to register for an administrative account for the business.

After clicking on this function, a new registration screen will appear as follows:

At this screen the business registrant enters:
[1] In the box Tax code: The registrant enters the tax code of the business to be registered.
[2] In the Password box: Subscribers enter the password they want to create.
[3] In the Confirm Password box: The registrant re-enters the password he wants to create.
In the Digital Signature Information section of the registrant, after plugging in the USB of the enterprise's digital signature, then press the button Read CKS (Read digital signature) to read information from the digital signature. When pressing the read button, the following message is displayed:

Subscribers press the button 'No' to read the digital signature (in the case of 'Yes' will not be read, the subscriber needs to close the browser and turn it back on to do it again).
After successfully reading the digital signature, the registrant presses the button Sign up to register an admin account. The system will check whether the digital signature information and the enterprise's Tax ID number match the digital signature. If so, the system will report success and the registrant will take the next steps. If not, contact the digital signature provider to check (some common problems about digital signatures are in Section 5). of this document)
Step 2: Log in to the system with an administrator account to register information
After successfully registering for an administrator account, the registrant returns to the original screen and clicks on the Login button as follows:

The login screen will now appear:
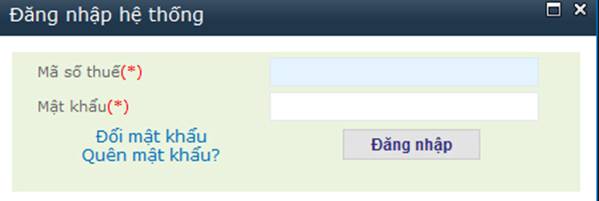
On the login screen to the system, the registrant enters the following business information into the login screen (Figure 1.2):
[1] In the box Tax code: The registrant enters the tax code of the business
[2] In the Password box: The registrant enters the registered password.
After entering all the above information, press the . button Log in to access the system. Then the screen will display the system functions:
1.2. Register user information of the enterprise's VNACCS system
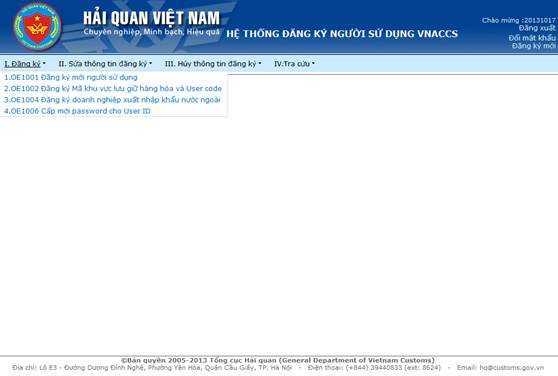
After logging in to the system, the registrant will declare detailed information about the business by going to the function:
I. Registration » 1. OE10001 New User Registration
Note: The data fields on the registration screen, the fields marked with an asterisk (*) are required fields.
At the User Information Registration screen, the registrant must enter the information of the enterprise. This information is divided into 3 groups corresponding to the following screens (tabs).
1.2.1. Register for general information:

Step 1: At the General Information screen, the registrant needs to enter the following information:
[1]In the field of Representative Name: Registrant enter the name of the representative of the business.
[2] In the Business Address field: The registrant enters the address of the business.
[3] In the Tax ID field: The registrant enters the tax code of the business.
[4] In the field of field of activity: The registrant selects the field of operation of the enterprise which is classified as follows (multiple fields can be selected at the same time):
– Transportation (Shipping lines, airlines, railway companies, Register to do Manifest declaration procedures and information related to means of transport)
– Import and export (Register as an import-export enterprise)
– Logistic (Forwarder, shipping agent, customs agent)
[5] In the field Number of user codes: Normally, each business has 1 user code, if the business has many branches, it is possible to register 1 user code for each branch and enter the total number of user codes in this field. .
After entering the number of User Codes, the registrant needs to enter a number of criteria corresponding to each User code for using the system as shown in Figure 1.4 below:

– Field No: This is the ordinal number of the User code.
– User code field: User code generated by the system itself.
– Field Number of User ID declared VNACCS-EDI: In this field, the registrant enters the total number of users declared to the VNACCS system according to VNACCS-EDI standard (applicable to all operations) of the enterprise. . Pay attention to how many User IDs are entered, on the information tab The customs declarant must enter all the information of the corresponding customs declarant.
– The User ID Number field declares EDIFACT: In case businesses connect to VNACCS system via EDIFACT standard (This is the connection standard of the system applicable to the case of shipping lines declaring Manifest by sea). In this field, the registrant enters the number of users of the enterprise according to the EDIFACT standard. If not, no need to enter.
Note: For users who register the item Quantity of User ID declared in EDIFACT, they still have to register the item Number of User ID declared VNACCS-EDI (Because in addition to declaring Manifest according to EDIFACT standard, shipping lines still have to declare documents other in VNACCS-EDI format).
– Field Number of computers: In this field, the system will automatically output the total value in the data fields: Terminal software, System – VNACCS-EDI system and System – EDIFACT system
– Terminal software field: In this field, the registrant enters the number of computers using free terminal software (provided by Customs) to connect to the system. If not, do not enter (default is 0).
– System field – VNACCS-EDI System: The registrant enters the number of computers using the software developed by the enterprise itself or the software provided by third parties that will connect to the customs system. If not, do not enter (default is 0).
– System field – EDIFACT System: The registrants who enter the number of computers using the self-developed enterprise's system or the software provided by 3rd parties will connect to the customs system through the EDIFACT standard. to declare Manifest. If not, do not enter (default is 0).
[6] In the Business proposal field: The registrant enters the business proposal when registering (If any).
Step 2: After declaring the criteria, press the Record button to record the information in the system, then switch to the Information screen of the customs declarant to continue the declaration.
1.2.2. Register information about customs declarants

Step 1: Information about the enterprise's customs declarant
At this screen, the registrant enters the information about the Customs Declarant corresponding to the User code of the enterprise. Each user code of an enterprise can register many customs declarants.
[1] In the field No. User code: The registrant chooses the ordinal number of the User code declared in the General information section, this ordinal number is the serial number outputted in the general information screen.
[2] In the field Full name: Registrant enter the full name of the customs declarant.
[3] In the ID card (or passport) number field: The registrant enters the identity card or passport number of the customs declarant.
[4] In the field of Customs declaration certificate number (if any): In case the user is granted a customs declaration certificate, enter that number in this information field, if there is no certificate, it can be omitted.
[5] In the Email field of the customs declarant: The registrant enters the email of the customs declarant.
[6] In the field of field of activity: The registrant chooses the field in which the customs declarant will make the declaration.
[7] In the Effective Date field: The registrant enters the date on which the declarant can start declaring the system.
[8] In the Expiry Date field: The registrant enters the date that this customs declarant expires to declare to the system.
[9] In the Digital signature section of the customs declarant, the registrant plugs in the digital signature usb token that the customs declarant will use to declare to the system and press the button Read CKS then the information of the signature number will be automatically displayed.
After declaring the criteria, click the Add button, now information about the declarant will be displayed below and you can add other declarants as well as delete the declarant you do not want to use by checking the declared User ID. alert and press the Delete button.

Step 2: After completing the declaration, press the Record button to record the information into the system.
Step 3: After completing the declaration, if the declaration does not need to be corrected, the registrant can proceed to Section 1.4 to register it with Customs, if it needs to be corrected, continue to Section 1.3 below.
1.3. Edit registration information before sending to the system:
During the data entry process, the enterprise's registrant can amend and supplement his information before sending it to the customs system by:
Step 1: Enter the information lookup screen by performing the Lookup function » Look up registration information (Figure 1.11)
Step 2: Then check the box New registration and click the Search button. The system will display the declared records. The subscriber finds the imported record (with the status Inputting) and clicks the Edit button. At this point, the information input screen will appear and the registrant can edit it.
Step 3: After editing, press the Record button to save it on the system. Then move to section 1.3 to register to the customs system
1.4. Register to the Customs system
After fully declaring the required information, the registrant sends registration information to the customs system by:
Step 1: Enter the information lookup screen through the V function. Lookup >> 1.OE4001. Look up registration information.
Step 2: Select the box New registration or Edit after approval or Cancel after approval depending on the new registration form, edit or cancel and click the Search button. The system will display the declared records. Subscribers find the record they just entered (with the status Inputting). The registrant presses the Submit button to proceed to the customs system.
Step 3: After pressing the Submit button, the registration confirmation screen will be displayed (Screen 1.12), now the registrant must fill in the following information:
[1] In the Sender field: The applicant enters his/her name in this field.
[2] At the Send to customs field: The applicant fills in the code of the Customs Department where the enterprise regularly declares customs procedures. In the first box, type the code of the Customs Department where the enterprise does customs procedures (Only enter the code of the Department, do not enter the code of the branch), the code table of the Department is on page 4 of this document. After typing the code, press the tab key to automatically switch to the name of the Customs Department.
Step 4: After entering the required information, the registrant needs to confirm the declaration by plugging in the digital signature with the digital signature of the enterprise and clicking the Sign digital signature button.

Step 5: After signing the digital signature, the registrant presses the Submit button to send it to the customs system and get the feedback results through the Lookup function of registration information. The steps are described in Section 1.5.Check registration information.
1.5. Check registration information
After receiving the registration information of the enterprise, the system will return the approval result to the enterprise. Subscribers take the following steps to check.
Step 1: Enter the information lookup screen by performing the function IV.Lookup » Look up registration information (Figure 1.13) to check.
Step 2: After entering the registration information lookup screen, the registrant selects the box New registration (Edit or Cancel depending on the status of the declaration is edited or canceled) and press the Search button. Then go to the declaration you just registered to check the feedback from the system.

Step 3: The system feedback includes:
[1] In the column Receipt number: Display the receipt number of the declaration, notice that the user needs to remember the reception number to use for future operations.
[2] In the column of year of receipt: Display the year of receipt of the declaration, notice that the user needs to remember the year of receipt to use for future operations.
[3] At the Status column, the declaration's status information is displayed. There are two types of states:
– If the system has not approved the declaration, the status will be: Waiting for approval.
– If the system approves the declaration, there will be a status: The customs accepting the registrant will go to Section 1.6 Look up registration results to get the registration results.
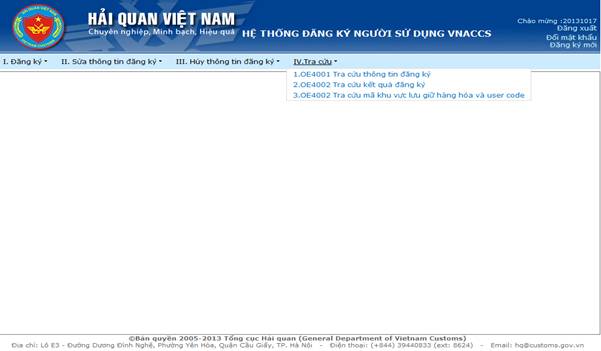
1.6. Look up registration results

Enterprises enter the function: IV.Look up > Look up registration results
The search information after successful registration is returned as follows:
+ Information about the enterprise's User Code;
+ Information about User ID;
+ Information about Terminal ID (note the last character if it is C, it is used for free software (provided by customs), if it is K, it is used for third parties or self-developed. will use a Terminal ID corresponding to the reporting software.
+ Information about Terminal Access key: The workstation's access key will come with the corresponding Terminal ID, this information is used for connection, configuration, customs declaration;
+ Information about the default password (Note that this default password must be renewed to be usable, instructions for changing the password are in section 4 of this document).
The registration result lookup screen returns as follows:

General information registration result lookup screen

Screen to look up results of customs declaration registration information

Figure 1.22: Computer registration result lookup screen

Default password result lookup screen
After the declaration is approved by the system, the new enterprise can use the registration information to log in to the terminal software to declare to the Customs. In case it is necessary to amend, supplement or invalidate the information already approved by the system, you can refer to sections 2 and 3 of this document.
2. Amendment and supplementation of registration information after it is approved by the customs system
2.1. Edit general and user information after being approved by the system:
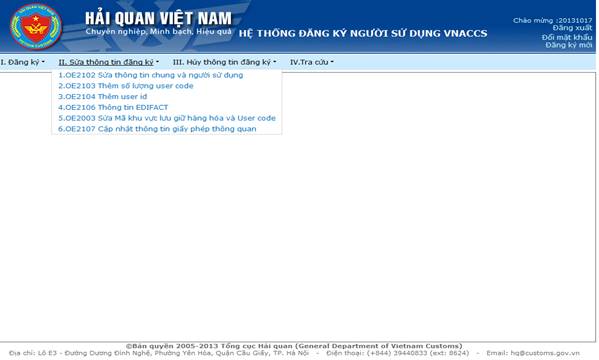
To edit the general and user information after it has been approved by the customs, the registrant needs to take the following steps.
Step 1: Enter function II. Edit registration information » 1.OE2102 Edit general and user information
Step 2: The general information editing screen will now appear (Screen 1.15).
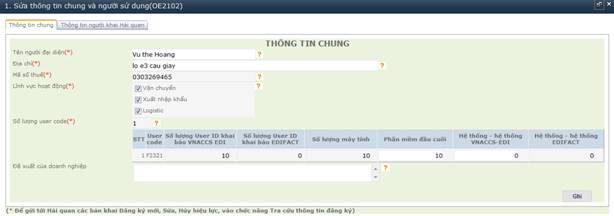
Step 3: This edit screen allows the user to edit the following information (uncorrectable criteria will be greyed out):
[1] In the Representative Name field: The registrant can edit the name of the representative of the registered enterprise.
[2] In the Business Address field: Registrants can edit the address of the registered business.
[4] In the field of activity: The registrant can edit the information by selecting the field of activity of the enterprise classified as follows (multiple fields can be selected at the same time):
– Transportation (Shipping lines, airlines, railway companies, Register to carry out procedures for transporting goods)
– Import and export (Register as an importer)
– Logistic (Transport agent (Forwarder), Tax-suspension area, Shipping (Transporter, Shipping agent, Customs agent)
[5] In the field Number of User Codes: Registrants can edit the following information:
+ Terminal software: The registrant enters the number of computers that the enterprise uses the free customs terminal software to declare. When registering this information will return Terminal ID and Terminal Access key for businesses to fill in the terminal.
+ System – VNACCS EDI system: The registrant enters the total number of computers that the enterprise uses third-party software (if any) and the number of computers using self-built software (if any). When registering this information will return Terminal ID and Terminal Access key for businesses to fill in the software.
[6] In the Business proposal field: The registrant enters the business proposal when registering (If any).
After editing the information, press the Record button to record the information.
Step 4: After modifying the information at the General Information screen, the registrant switches to the Customs Declarant Information screen to edit (Figure 1.16).
At the Customs Declarant Information screen, the registrant can select the declarant to be corrected in the list displayed on the screen.

This screen allows the registrant to edit the registered information (the criteria that cannot be edited will be greyed out):
After editing the criteria, click the Record button to save the modified information. Then information about the declarant will be updated and displayed below. The registrant can continue to correct the information of other declarants.
Step 5: After correcting the information of the customs declarant, the registrant needs to send the revised information to the customs for approval by following the instructions in Section 1.3. Register to Customs, pay attention to select Edit after approval to find the declaration being edited.
2.2. Add User code after it is approved by the customs system:
Step 1: In case businesses want to create more User code, they need to enter the function Add the number of User codes as follows: Enter the function: II.Edit registration information » 2. OE2103.Add the amount of User code
Step 2: At this time, the general information screen of the function to add the number of User codes will appear (Screen 1.17). At this general information screen can only be changed in the Usercode Amount field, other fields that cannot be changed will be greyed out.
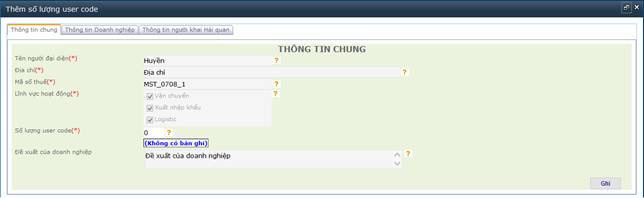
Add the number of user codes after it has been approved by the customs
Step 3: In the field Number of user codes: Enter the number of User codes you want to add.
After entering the amount of User code you want to add, the registrant needs to enter information related to the User code. This information should refer to section 1.2.1. General information in the field Number of User codes.
Example: The figure below illustrates a case of adding 02 User code and related information (the figures are assumed, the user depends on the fact to declare accordingly).

Step 4: After declaring more user code, the registrant presses the Record button to save information to the system and needs to declare more User ID for the representative to declare for that User code, switch to the screen tab to declare the customs declarant to enter information.
Information about the enterprise's customs declarant includes the following information:

Information screen about customs declarers: This User ID (customs declarant) information belongs to a User code of the enterprise to represent the User code declared to the system, each User code of the enterprise. Enterprises can register multiple User IDs. Instructions on how to declare information of User ID refer to 1.2.2. Register information about customs declarants.
After entering the information about the customs declarant, press the Record button to record the information into the system.
Step 5: After correcting the customs declarant's information, the registrant needs to send the revised information to the customs for approval. The way to send to customs is done as guided in Part I, Section 1.3. Register to Customs, pay attention to select Edit after approval to find the modified declaration to send.
2.3. Add User ID after it is approved by the customs system
Step 1: In case the enterprise wants to create more User IDs after the declaration has been approved by the Customs, they need to enter the Add User ID number function as follows:
Enter the function: II.Edit registration information » 3.OE2104.Add User ID
Step 2: At this time, the general information screen of the function of adding the number of User IDs will appear, At this general information screen can only be changed in the field of User ID declared in VNACCS EDI, other fields cannot be changed. blurred out.

Step 3: In the field Number of User IDs declared VNACCS EDI: Enter the total amount including the number of User IDs you want to add.
For example: The number of existing User IDs is 10, but if you want to add 5 more User IDs, enter 15 in this box.
Step 4: After declaring more User ID, the registrant presses the Record button to save the information to the system and switch to the tab of the screen to declare the customs declarant to enter information about each User ID user wants to add. Note how many User IDs in the General Information Tab must be entered in the Customs Declarant Information Tab.
Information about the enterprise's customs declarant includes the following information:
.jpg)
Information screen about customs declarers: This User ID (customs declarant) information belongs to a User code of the enterprise to represent the User code declared to the system, each User code of the enterprise. Enterprises can register multiple User IDs. Instructions on how to declare information of User ID refer to 1.2.2. Register information about customs declarants.
After entering the information about the customs declarant, press the Record button to record the information into the system.
Step 5: After correcting the customs declarant's information, the registrant needs to send the revised information to the customs for approval. The way to send to customs is done as guided in section 1.3. Register to Customs, pay attention to select Edit after approval to find the modified declaration to send.
3. Cancellation of registration information

3.1. Canceling user registration information before sending it to the customs system:
Step 1: In case the enterprise wants to cancel the registration information before sending it to the customs, the user can go to the Look up registration information function to perform the cancellation (Figure 1.25).
Step 2: At the screen Look up registration information, select the box New registration and press the Search button, then find the declaration.
Step 3: Select the box next to the declaration to be destroyed and then press the Delete button, then the system will appear a screen to confirm the deletion of information, after agreeing the declaration will be deleted from the system.

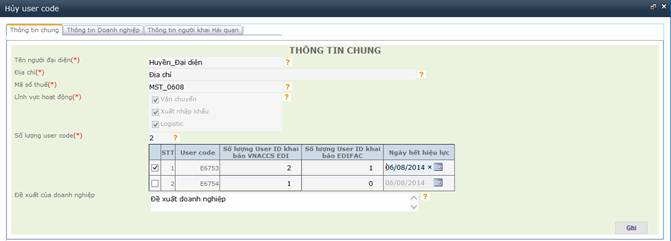
3.2. Cancellation of the User code after it is approved by the customs system:
In case enterprises want to invalidate User code information after being approved by customs, they need to do the following steps:
Step 1: Enter the function: III.Deactivate registration information » Disable User code information.
Step 2: Then the User code information invalidation screen will appear (Figure 1.27), the registrant selects the record of the User code to be Deactivated and enters the expiration date in the column Expiration date of the User code to be Canceled. effect.
Click Record to update information to the system.
Step 3: After correcting the customs declarant's information, the registrant needs to send the revised information to the customs for approval. The way to send to customs is done as guided in section 1.3. Register to Customs, pay attention to select Cancel after approval to find the cancellation declaration to send.
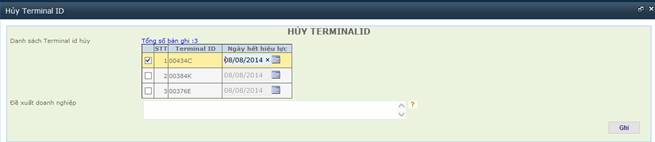
3.3. Deactivate Terminal ID after it is approved by the customs system.
In case businesses want to cancel Terminal ID information after approval, they need to do the following steps:
Step 1: Enter function: III. Deactivate registration information » Deactivate Terminal ID
Step 2: Then the Terminal ID Information Deactivation screen will appear (Figure 1.30), the registrant selects the Terminal ID record to be canceled and enters the expiration date in the Terminal ID Expiration Date column to be Deactivated. .
Click Record to update information to the system.
Step 3: After correcting the customs declarant's information, the registrant needs to send the revised information to the customs for approval. The way to send to customs is done as guided in section 1.3. Register to Customs, pay attention to select Cancel after approval to find the cancellation declaration to send.
3.4. Deactivate User ID after it is approved by the customs system.
In case businesses want to Deactivate User ID information after approval, they need to do the following steps:
Step 1: Enter the function: Deactivate registration information » Deactivate User ID
Step 2: The User ID Information Deactivation screen will then appear (Figure 1.33), the registrant selects the User ID record to cancel and enters the expiration date in the User ID's Expiration Date column to cancel.
Click Record to update information to the system.

Step 3: After correcting the customs declarant's information, the registrant needs to send the revised information to the customs for approval. The way to send to customs is done as guided in section 1.3. Register to Customs, pay attention to select Cancel after approval to find the cancellation declaration to send.
4. Change password
In order to ensure security, after receiving the notification of the access account, the enterprise's users need to log in to the VNACCS system to change their password.
4.1. Change the password for the User ID (customs declarant) of the enterprise
There are two ways to change the password for User ID
a. Method 1: The administrator will log into the system to change the User ID in case the customs declarant forgets the password.
Step 1: Enter the function: Registration » New password for users.
Step 2: At this time, the screen will appear, On the password change screen, the user will enter the information to change the password as follows:
[1]In the User ID field: The user enters the User ID provided by the system
[2] In the New Password field: The user enters the new password he needs to set up
[3] In the Confirm Password field: The user enters a new password that he needs to set up for re-authentication.
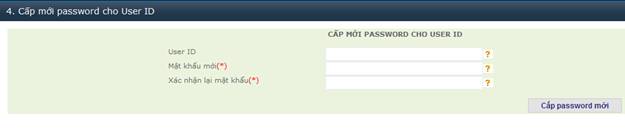
Step 3: Press the button Grant new password to save the information to the system. After one day the new password can be used in the system.
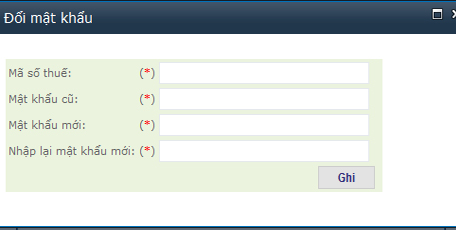
b. Method 2: Users change their own password by going to the function Change password for User ID as shown below:

Then the password change screen appears and the user can change his password as follows:

[1]In the User ID field: The user enters the User ID provided by the system
[2] In the Old Password field: User enters his old password
[3] In the New Password field: The user enters the new password he needs to set up
[4] In the Re-enter new password field: The user enters the new password that he needs to set up for re-authentication.
One day after changing the password, it can be used in the system.
4.2. Change the password for the administrator of the business
How to change the password for the administrator by going to the Login function and then clicking the Change Password button as shown below:

Then the administrator proceeds to change his password as shown below:
[1] In the box Tax code: The administrator of the enterprise enters the tax code of the business to be registered.
[2] In the box Old password: The administrator of the enterprise enters the old password.
[3] In the box New password: The administrator of the enterprise enters the password you want to create.
[4] In the box Re-enter new password: The administrator of the enterprise re-enters the password you want to create. This password can always be used.
4.3. In case the administrator forgot his password
If the administrator has forgotten the password, he needs to enter the Login function and then click the Forgot Password button as shown below:
.jpg)
Then the administrator proceeds to get his password as shown below like the new registration:

The system will automatically check the information about tax code, digital signature information corresponding to the administrative account of the enterprise.
Case 1: if the information matches (correct tax code, valid digital signature), the system will return a new password to the administrator.
Case 2: if the administrator does not have information about the digital signature corresponding to the administrative account (due to the loss of the digital signature or the expiration of the digital signature): Due to information about the user account of the VNACCS system and the signature Numbers are confidential information directly related to the business, to ensure the interests and security of the business, users need to take steps in one of two ways:
– Send official documents and documents by post to the Center for Management and Operation of Customs IT System – General Department of Customs – Lot E3 Duong Dinh Nghe – Yen Hoa – Cau Giay – Hanoi
– Directly bring the file to the Center for Management and Operation of Customs IT System – General Department of Customs – Lot E3 Duong Dinh Nghe – Yen Hoa – Cau Giay – Hanoi
* Profile information includes:
– Dispatch requesting for new password/re-updating digital signature information (dispatch prepared by the company itself, stamped and certified by the company leader, providing company address, email, number contact phone);
– Authenticated/notarized copy of the business registration license of the enterprise;
– Authenticated/notarized copy of Tax registration certificate if the business registration license does not have a tax code;
– Authenticated/Notarized copy of People's Identity Card/Citizen ID/Passport of the legal representative of the enterprise;
– Letter of introduction (in case of directly bringing the dossier to the General Department of Customs).
Within a maximum of 5 working days, the Support Department of the General Department of Customs will process the dossier and respond to the enterprise via the registered email of the enterprise in the written request.
4.4. In case of loss of information or expiration of the validity of the digital signature of the enterprise's administrative account:
To update the digital signature information of the VNACCS user registration system administrator account, the enterprise must follow the instructions in Case 2, Section 4.3 above.
5. Frequently asked questions and concerns:
+ Question: The enterprise has a User ID with the same digital signature to declare, so how to add User ID with another digital signature to declare:
How to handle: In case the enterprise wants to add a User ID with another digital signature to declare, go to Part II, Section 2.3 Add User ID after being approved by the customs system to add User ID and digital signature used for declaration.
+ Question: Enterprise when declaring error A0035: Invalid CA name or incorrect digital signature A0036.
How to handle: Enterprises can check the digital signature to declare corresponding to User ID by doing Part II, Section 1.6. Look up the registration results in the customs declarant information tab to see the digital signature. associated with User ID to declare. If there is no information associated with the digital signature, the enterprise can modify the information to add a digital signature by performing Part II, Section 2.1 Editing general and user information after it is approved by the system, there, select the User ID that needs to add a digital signature and read the digital signature again for declaration.
+ Problems when inserting a digital signature but pressing the button to read the digital signature cannot be:
How to handle: Need to check whether the computer has received a digital signature or has a digital signature installed, need to see if the required Java is installed to read the digital signature, please install the correct Java version at the registration page the user according to the correct 32bit or 64bit version of the computer.
Check on Internet Explorer browser to see if Java is disabled by doing the following:
Open Internet Explorer, go to Tools > Internet Options > Go to Security Tab > Select Custom Level > Display a window then scroll down to the bottom to find Scriping of Java Applets > If it's Disable, then select Enable, still Enable original.

If that doesn't work, try switching to another computer to install and try again on IE 7 or later and contact your digital signature provider for support.
+ Problems: Enterprises currently have a revised (or canceled) declaration that has not been approved by the Customs:
Solution: This problem is because the enterprise already has an edit (or cancel) declaration that has not been sent to the customs, to delete the declaration that is editing (or canceling) the administrator needs to enter the function V. Lookup > Look up the registration information, select the Edit (or cancel) button and press the Search button. At this time, the declaration that is being edited (or canceled) will be displayed, the administrator will delete it or choose to continue editing (or cancel).
+ Problem: “OE1001-00009: The enterprise already has a registration declaration on the system.”
How to handle: This problem is because the system has created default information available for some businesses, now businesses only need to add information, modify information, not need to register new. Enterprises follow the instructions in Section 5, Part I of this document.
+ Problem: The enterprise expires the digital signature and when re-issued, the supplier issues a digital signature with a different Serial Number:
How to handle: For this problem, enterprises need to go to Section 2.1 to modify general information and users. Go to the customs declarant and select the User ID to update the digital signature, then read the newly issued signature again and follow the instructions in it.
+ Problems: Invalid digital signature when registering new:
Solution: This problem is caused by the digital signature of the enterprise using not the digital signature of the purchasing enterprise of the supplier. Please check again or contact the digital signature provider.
+ Problems: Tax code [XXXXXXX] previously registered.:
Solution: This problem is because the enterprise has registered a new administrative account information, please go to the login section and then go to the Forgot password function to change the login information, instructions for payment. details in Part II, Section 4.3.
Other problems:
Please turn off and on the browser you are using or restart your computer. If it still doesn't work, please contact us Customs Departments of provinces and cities where registered for assistance.